389-ds: различия между версиями
(→Ссылки) |
Ckt (обсуждение | вклад) |
||
| (не показано 13 промежуточных версий 4 участников) | |||
| Строка 1: | Строка 1: | ||
Настройка сервера каталогов {{pkg|389-ds}} (http://directory.fedoraproject.org/) | Настройка сервера каталогов {{pkg|389-ds}} (http://directory.fedoraproject.org/) | ||
= Первоначальная настройка = | = Первоначальная настройка = | ||
| Строка 11: | Строка 9: | ||
apt-get install 389-ds | apt-get install 389-ds | ||
2. Создание экземпляра каталога | 2. Адаптация окружения: | ||
2.1. Создайте файл {{path|/etc/sysctl.d/389-ds.conf}}: | |||
<source lang="Ini">fs.file-max = 64000 | |||
net.ipv4.tcp_keepalive_time = 60</source> | |||
2.2. В {{path|/etc/security/limits.conf}} добавьте: | |||
* soft nofile 2048 | |||
2.3 Примените изменения: | |||
sysctl -p /etc/sysctl.d/389-ds.conf | |||
Выйти и зайти в сеанс root (для принятия нового лимита открытых файлов). | |||
Запустите проверку окружения для 389-ds: | |||
<pre>dsktune -q</pre> | |||
В случае готового окружения ничего не будет выведено. | |||
3. Создание экземпляра каталога | |||
{{Attention|Для управления сервером через консоль управления {{pkg|389-console}} необходимо начать развёртывание скриптом {{cmd|setup-ds-admin.pl}}}} | |||
<pre>[root@c228 ~]# setup-ds.pl | <pre>[root@c228 ~]# setup-ds.pl | ||
| Строка 139: | Строка 159: | ||
= Управление службой = | = Управление службой = | ||
== В новых версиях == | |||
Запуск: | |||
service dirsrv start | |||
Остановка: | |||
service dirsrv stop | |||
== В старых версиях (p7) == | |||
Запуск: | Запуск: | ||
service fedora-ds start | service fedora-ds start | ||
| Строка 152: | Строка 179: | ||
== Удаление экземпляров 389-ds == | == Удаление экземпляров 389-ds == | ||
service | service dirsrv stop | ||
rm -rf /etc/ | rm -rf /etc/dirsrv/slapd-* /var/lib/dirsrv/* /var/log/dirsrv/* | ||
killall ns-slapd | killall ns-slapd | ||
== Запуск мастера установки 389-admin == | == Запуск мастера установки 389-admin == | ||
setup-ds-admin.pl | setup-ds-admin.pl | ||
| Строка 166: | Строка 192: | ||
1. Установите {{pkg|389-console}}: | 1. Установите {{pkg|389-console}}: | ||
apt-get install 389-console 389-ds-console fonts-ttf- | apt-get install 389-console 389-ds-console fonts-ttf-liberation xauth | ||
2. Запустите {{cmd|389-console}} на сервере (например, зайдя туда по ssh -Y с графической станции Linux): | 2. Запустите {{cmd|389-console}} на сервере (например, зайдя туда по ssh -Y с графической станции Linux): | ||
| Строка 176: | Строка 202: | ||
[[Изображение:389-console-window.png]] | [[Изображение:389-console-window.png]] | ||
= Troubleshooting = | |||
После установки, видим, что запись в журнале systemd ("journal -xe") "Failed to start 389 Administration Server" свидетельствует о том, что service dirsrv-admin.service имеет статус "failed". Для того, чтобы dirsrv-admin.service успешно запустился, необходимо в файле /etc/dirsrv/admin-serv/httpd.conf закомментировать следующие строки: | |||
#Load Module mpm_worker_module /usr/lib64/apache2/modules/mod_mpm_worker.so | |||
#Load Module unixd_module /usr/lib64/apache2/modules/mod_unixd.so | |||
= Быстрое развёртывание 389-ds и 389-admin = | = Быстрое развёртывание 389-ds и 389-admin = | ||
| Строка 225: | Строка 256: | ||
3. Проверяем запуск служб и наличие открытых портов: | 3. Проверяем запуск служб и наличие открытых портов: | ||
<source lang="Text">[root@c228 ~]# service | <source lang="Text">[root@c228 ~]# service dirsrv status | ||
dirsrv c228 (pid 31648) is running... | |||
[root@c228 ~]# service | [root@c228 ~]# service dirsrv-admin status | ||
dirsrv-admin (pid 31740) is running... | |||
[root@c228 ~]# ss -lnp|egrep ':(390|9830)' | [root@c228 ~]# ss -lnp|egrep ':(390|9830)' | ||
tcp LISTEN 0 128 *:9830 *:* users:(("httpd2.worker",31744,3),("httpd2.worker",31740,3)) | tcp LISTEN 0 128 *:9830 *:* users:(("httpd2.worker",31744,3),("httpd2.worker",31740,3)) | ||
| Строка 236: | Строка 267: | ||
= Ссылки = | = Ссылки = | ||
* http://habrahabr.ru/company/scalaxy/blog/86090/ | * http://habrahabr.ru/company/scalaxy/blog/86090/ (на русском языке) | ||
* [https://access.redhat.com/documentation/en-US/Red_Hat_Directory_Server/9.0/html/Plug-in_Guide/index.html Как писать плагины для 389-ds] (на англ.) | |||
* https://www.centos.org/docs/5/html/CDS/ag/8.0/ (на англ.) | * https://www.centos.org/docs/5/html/CDS/ag/8.0/ (на англ.) | ||
* | * http://www.linuxmail.info/ad-fds-sync-howto/ (на англ.) | ||
* | * https://supermarket.getchef.com/cookbooks/dirsrv/versions/0.1.1 | ||
Кроме этого, вот образец скрипта, который надо выполнить на cервере AD, чтобы получить загружаемый файл для 389-ds, который создаст нестандартные OU для синхронизации с AD. | |||
<pre> | |||
ldifde -f example_groups.ldif -d "dc=example,dc=com " -p subtree -r "(&(objectCategory=group)(objectClass=group))" -l "cn,objectclass" | |||
ldifde -f example_users.ldif -d "dc=example,dc=com" -p subtree -r "(&(objectCategory=person)(objectClass=User)(givenname=*))" -l "cn,givenName,objectclass,samAccountName" | |||
ldifde -f example_ous.ldif -d "dc=example,dc=com" -p subtree -r "(objectCategory=organizationalUnit)" -l "cn,objectclass,ou" | |||
</pre> | |||
{{Category navigation|title=HOWTO|category=HOWTO|sortkey={{SUBPAGENAME}}}} | |||
Текущая версия от 13:22, 23 января 2019
Настройка сервера каталогов 389-ds (http://directory.fedoraproject.org/)
Первоначальная настройка
ss -nlp | awk '/ns-slapd/ { print substr($5,4) }'
1. Установка
apt-get install 389-ds
2. Адаптация окружения:
2.1. Создайте файл /etc/sysctl.d/389-ds.conf:
fs.file-max = 64000
net.ipv4.tcp_keepalive_time = 60
2.2. В /etc/security/limits.conf добавьте:
* soft nofile 2048
2.3 Примените изменения:
sysctl -p /etc/sysctl.d/389-ds.conf
Выйти и зайти в сеанс root (для принятия нового лимита открытых файлов).
Запустите проверку окружения для 389-ds:
dsktune -q
В случае готового окружения ничего не будет выведено.
3. Создание экземпляра каталога
[root@c228 ~]# setup-ds.pl

==============================================================================
This program will set up the 389 Directory Server.

It is recommended that you have "root" privilege to set up the software.
Tips for using this  program:
  - Press "Enter" to choose the default and go to the next screen
  - Type "Control-B" or the word "back" then "Enter" to go back to the previous screen
  - Type "Control-C" to cancel the setup program

Would you like to continue with set up? [yes]: yes

==============================================================================
Your system has been scanned for potential problems, missing patches,
etc.  The following output is a report of the items found that need to
be addressed before running this software in a production
environment.

389 Directory Server system tuning analysis version 23-FEBRUARY-2012.

NOTICE : System is x86_64-unknown-linux3.10.30-std-def-alt1 (1 processor).

NOTICE : The net.ipv4.tcp_keepalive_time is set to 7200000 milliseconds
(120 minutes).  This may cause temporary server congestion from lost
client connections.

WARNING: There are only 1024 file descriptors (soft limit) available, which
limit the number of simultaneous connections.

WARNING  : The warning messages above should be reviewed before proceeding.

Would you like to continue? [no]: yes

==============================================================================
Choose a setup type:

   1. Express
       Allows you to quickly set up the servers using the most
       common options and pre-defined defaults. Useful for quick
       evaluation of the products.

   2. Typical
       Allows you to specify common defaults and options.

   3. Custom
       Allows you to specify more advanced options. This is
       recommended for experienced server administrators only.

To accept the default shown in brackets, press the Enter key.

Choose a setup type [2]: 2

==============================================================================
Enter the fully qualified domain name of the computer
on which you're setting up server software. Using the form
<hostname>.<domainname>
Example: eros.example.com.

To accept the default shown in brackets, press the Enter key.

Warning: This step may take a few minutes if your DNS servers
can not be reached or if DNS is not configured correctly.  If
you would rather not wait, hit Ctrl-C and run this program again
with the following command line option to specify the hostname:

    General.FullMachineName=your.hostname.domain.name

Computer name [c228.school.alt]:

==============================================================================
The server must run as a specific user in a specific group.
It is strongly recommended that this user should have no privileges
on the computer (i.e. a non-root user).  The setup procedure
will give this user/group some permissions in specific paths/files
to perform server-specific operations.

If you have not yet created a user and group for the server,
create this user and group using your native operating
system utilities.

System User [nobody]:
System Group [nobody]:

==============================================================================
The standard directory server network port number is 389.  However, if
you are not logged as the superuser, or port 389 is in use, the
default value will be a random unused port number greater than 1024.
If you want to use port 389, make sure that you are logged in as the
superuser, that port 389 is not in use.

Directory server network port [389]:

==============================================================================
Each instance of a directory server requires a unique identifier.
This identifier is used to name the various
instance specific files and directories in the file system,
as well as for other uses as a server instance identifier.

Directory server identifier [c228]:

==============================================================================
The suffix is the root of your directory tree.  The suffix must be a valid DN.
It is recommended that you use the dc=domaincomponent suffix convention.
For example, if your domain is example.com,
you should use dc=example,dc=com for your suffix.
Setup will create this initial suffix for you,
but you may have more than one suffix.
Use the directory server utilities to create additional suffixes.

Suffix [dc=school,dc=alt]:

==============================================================================
Certain directory server operations require an administrative user.
This user is referred to as the Directory Manager and typically has a
bind Distinguished Name (DN) of cn=Directory Manager.
You will also be prompted for the password for this user.  The password must
be at least 8 characters long, and contain no spaces.
Press Control-B or type the word "back", then Enter to back up and start over.

Directory Manager DN [cn=Directory Manager]:
Password:
Password (confirm):
Управление службой
В новых версиях
Запуск:
service dirsrv start
Остановка:
service dirsrv stop
В старых версиях (p7)
Запуск:
service fedora-ds start
Остановка:
service fedora-ds stop
Использование консоли управления
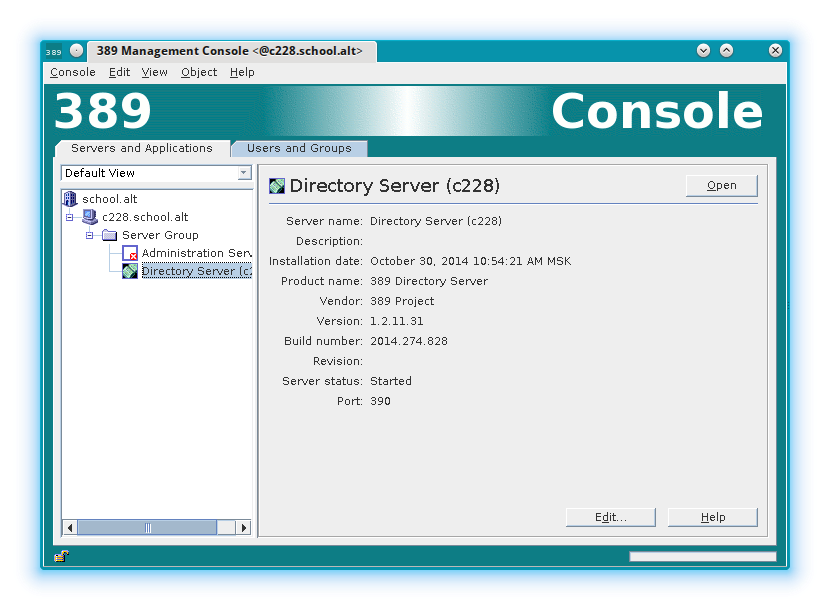
Для 389-ds есть консоль управления с графическим интерфейсом (пакет 389-console). Для управления потребуется развернуть 389-admin и настроить административный сервер. Этот сервер работает по умолчанию на порту 9830 и доступен как через графическую консоль, так и через веб-браузер (но уже только для статистики и просмотра журналов).
Удаление экземпляров 389-ds
service dirsrv stop
rm -rf /etc/dirsrv/slapd-* /var/lib/dirsrv/* /var/log/dirsrv/*
killall ns-slapd
Запуск мастера установки 389-admin
setup-ds-admin.pl
Во время установки будут запрошены пароли для администратора административного сервера (admin) и администратора базы данных (cn=Directory Manager). Входить можно под обоими учётными записями.
Запуск программы
1. Установите 389-console:
apt-get install 389-console 389-ds-console fonts-ttf-liberation xauth
2. Запустите 389-console на сервере (например, зайдя туда по ssh -Y с графической станции Linux):
389-console -u admin -a localhost:9830
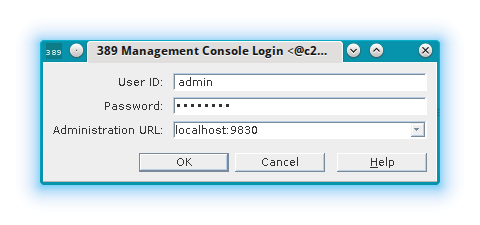
3. В появившемся диалоговом окне укажите имя пользователя (User ID:): admin или cn=Directory Manager), пароль и адрес административного сервера (Administration URL): localhost:9830
Troubleshooting
После установки, видим, что запись в журнале systemd ("journal -xe") "Failed to start 389 Administration Server" свидетельствует о том, что service dirsrv-admin.service имеет статус "failed". Для того, чтобы dirsrv-admin.service успешно запустился, необходимо в файле /etc/dirsrv/admin-serv/httpd.conf закомментировать следующие строки:
- Load Module mpm_worker_module /usr/lib64/apache2/modules/mod_mpm_worker.so
- Load Module unixd_module /usr/lib64/apache2/modules/mod_unixd.so
Быстрое развёртывание 389-ds и 389-admin
Параметры сервера:
| Параметр | Значение |
|---|---|
| Домен | school.alt |
| Имя сервера | c228.school.alt |
| Порт LDAP | 390 |
| Порт администрирования | 9830 |
| Пароль | 12345678 |
1. Создаём файл 389-ds-admin-setup.inf следующего содержимого:
[General]
AdminDomain = school.alt
ConfigDirectoryAdminID = admin
ConfigDirectoryAdminPwd = 12345678
ConfigDirectoryLdapURL = ldap://c228.school.alt:390/o=NetscapeRoot
FullMachineName = c228.school.alt
SuiteSpotGroup = nobody
SuiteSpotUserID = nobody
[admin]
Port = 9830
ServerAdminID = admin
ServerAdminPwd = 12345678
SysUser = nobody
[slapd]
HashedRootDNPwd = {SSHA}2DwlOV3BftpZQhZEAA7ai0oLPwn9lwsnKrGh7A==
InstallLdifFile = suggest
RootDN = cn=Directory Manager
RootDNPwd = 12345678
ServerIdentifier = c228
ServerPort = 390
Suffix = dc=school,dc=alt
UseExistingMC = 0
ds_bename = userRoot
2. Создаём экземпляры сервера администрирования и LDAP:
setup-ds-admin.pl --file 389-ds-admin-setup.inf --silent
3. Проверяем запуск служб и наличие открытых портов:
[root@c228 ~]# service dirsrv status
dirsrv c228 (pid 31648) is running...
[root@c228 ~]# service dirsrv-admin status
dirsrv-admin (pid 31740) is running...
[root@c228 ~]# ss -lnp|egrep ':(390|9830)'
tcp    LISTEN     0      128                    *:9830                  *:*      users:(("httpd2.worker",31744,3),("httpd2.worker",31740,3))
tcp    LISTEN     0      128                   :::390                  :::*      users:(("ns-slapd",31648,6))
[root@c228 ~]# ldapsearch -H ldap://c228:390 -x | grep ^result:
result: 0 Success
Ссылки
- http://habrahabr.ru/company/scalaxy/blog/86090/ (на русском языке)
- Как писать плагины для 389-ds (на англ.)
- https://www.centos.org/docs/5/html/CDS/ag/8.0/ (на англ.)
- http://www.linuxmail.info/ad-fds-sync-howto/ (на англ.)
- https://supermarket.getchef.com/cookbooks/dirsrv/versions/0.1.1
Кроме этого, вот образец скрипта, который надо выполнить на cервере AD, чтобы получить загружаемый файл для 389-ds, который создаст нестандартные OU для синхронизации с AD.
ldifde -f example_groups.ldif -d "dc=example,dc=com " -p subtree -r "(&(objectCategory=group)(objectClass=group))" -l "cn,objectclass"
ldifde -f example_users.ldif -d "dc=example,dc=com"  -p subtree -r "(&(objectCategory=person)(objectClass=User)(givenname=*))" -l "cn,givenName,objectclass,samAccountName"
ldifde -f example_ous.ldif -d "dc=example,dc=com" -p subtree -r "(objectCategory=organizationalUnit)" -l "cn,objectclass,ou"

