FreeRADIUS
Установка и настройка FreeRADIUS
Установить пакеты freeradius и freeradius-utils:
# apt-get install freeradius freeradius-utils
Добавить в автозапуск и запустить FreeRADIUS:
# systemctl enable --now radiusd.service
В конец файла /etc/raddb/users добавить пользователя (login: radiususer, password: radiuspass):
radiususer Cleartext-Password := "radiuspass"
Перечитать конфигурацию RADIUS:
# systemctl reload radiusd.service
Сделать тестовый запрос:
$ radtest radiususer radiuspass localhost 1218 testing123
Sent Access-Request Id 121 from 0.0.0.0:49584 to 127.0.0.1:1812 length 80
    User-Name = "radiususer"
    User-Password = "radiuspass"
    NAS-IP-Address = 192.168.0.101
    NAS-Port = 1218
    Message-Authenticator = 0x00
    Cleartext-Password = "radiuspass"
Received Access-Accept Id 121 from 127.0.0.1:1812 to 127.0.0.1:49584 length 20
Где:
- radiususer — проверяемая учётная запись;
- radiuspass — пароль учётной записи radiususer;
- localhost — сервер, у которого запрашивается проверка;
- 1218 — порт, на котором FreeRADIUS слушает запросы;
- testing123 — пароль для подключения клиентом к серверу FreeRADIUS (данный пароль создается по умолчанию для локальных запросов).
Ответ сервера, если проверка пройдена:
Received Access-Accept
Ответ сервера, если проверка провалена:
Received Access-Reject
Для того чтобы сервер FreeRADIUS отвечал на запросы с другого узла сети, необходимо информацию об этом узле добавить в файл /etc/raddb/clients.conf, например:
client myclient {
       ipaddr          = 192.168.0.102
       secret          = password
}
Где:
- myclient — произвольное название для клиента;
- 192.168.0.102 — IP-адрес клиента;
- password — пароль для подключения клиента к серверу FreeRADIUS.
Перезапустить сервер FreeRADIUS:
# systemctl restart radiusd.service
На клиенте:
- Установить пакет freeradius-utils:
# apt-get install freeradius-utils
- Сделать тестовый запрос:
$ radtest radiususer radiuspass 192.168.0.101 1218 password
Sent Access-Request Id 110 from 0.0.0.0:36045 to 192.168.0.101:1812 length 80
    User-Name = "radiususer"
    User-Password = "radiuspass"
    NAS-IP-Address = 192.168.0.102
    NAS-Port = 1218
    Message-Authenticator = 0x00
    Cleartext-Password = "radiuspass"
Received Access-Accept Id 110 from 192.168.0.101:1812 to 192.168.0.102:36045 length 20
# systemctl stop radiusd.service
# radiusd -Xxx
Настройка многофакторной аутентификации
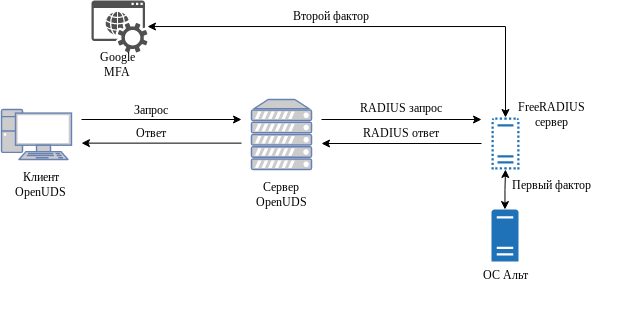
Ниже описан пример организации многофакторной аутентификации (MFA) с использованием FreeRADIUS-сервера и службы Google Authenticator.
Логическая схема взаимодействия компонентов, на примере OpenUDS, FreeRADIUS и службы Google Authenticator:
Настройка сервера FreeRADIUS
Включить модуль аутентификации PAM:
# ln -s /etc/raddb/mods-available/pam /etc/raddb/mods-enabled/pam
Раскомментировать строку #pam в файле /etc/raddb/sites-enabled/default (в разделе authenticate):
pam
В файл /etc/raddb/users после блока # Deny access for a group of users добавить строку DEFAULT Auth-Type := PAM:
# Deny access for a group of users.
#
# Note that there is NO 'Fall-Through' attribute, so the user will not
# be given any additional resources.
#
#DEFAULT        Group == "disabled", Auth-Type := Reject
#               Reply-Message = "Your account has been disabled."
#
DEFAULT Auth-Type := PAM
Перезапустить сервер FreeRADIUS:
# systemctl restart radiusd.service
Убедиться что PAM аутентификация работает для локального пользователя:
$ radtest user 123 localhost 1218 testing123
Sent Access-Request Id 223 from 0.0.0.0:40705 to 127.0.0.1:1812 length 74
	User-Name = "user"
	User-Password = "123"
	NAS-IP-Address = 192.168.0.101
	NAS-Port = 1218
	Message-Authenticator = 0x00
	Cleartext-Password = "123"
Received Access-Accept Id 223 from 127.0.0.1:1812 to 127.0.0.1:40705 length 20
Установить Google Authenticator (генератор QR-кодов) (пакеты libpam-google-authenticator и libqrencode4):
# apt-get install libpam-google-authenticator libqrencode4
Настроить PAM для комбинирования пользовательских паролей и PIN-кодов, генерируемых Google Authenticator, для этого привести файл /etc/pam.d/radiusd к виду:
auth       required   pam_google_authenticator.so  forward_pass
#auth            include         system-auth
#account         required        pam_nologin.so
account         include         system-auth
password        include         system-auth
session         include         system-auth
Добавить, если необходимо, информацию о клиенте в файл /etc/raddb/clients.conf:
client openuds {
       ipaddr          = 192.168.0.53
       secret          = password
}
Перезапустить сервер FreeRADIUS:
# systemctl restart radiusd.service
Настройка пользователей FreeRADIUS
Процесс настройки пользователей состоит из следующих шагов:
- Создание токена Google Authenticator.
- Регистрация Google Authenticator с использованием QR или секретного кода в мобильном приложении пользователя.
- Установка параметров Google Authenticator.
Пример настройки пользователя: Под учётной записью пользователя user создать токен Google Authenticator и установить его параметры:
$ google-authenticator -Q utf8

Do you want authentication tokens to be time-based (y/n) y
Warning: pasting the following URL into your browser exposes the OTP secret to Google:
  https://www.google.com/chart?chs=200x200&chld=M|0&cht=qr&chl=otpauth://totp/user@server%3Fsecret%3D54DPGWF6JIP5QKDIJAO4LKSRZ4%26issuer%3Dserver

  █▀▀▀▀▀█ ▀ █ █ █▄  ▄█▀ ▄▄▄█ ▀█ █▀▀▀▀▀█
  █ ███ █ ▄ █ ▀ ▀▀ █▄ ▄▀  ▀▄█▀▀ █ ███ █
  █ ▀▀▀ █ ███▄ ▀▀▀██▀█▄  ▀ ▀▄▀█ █ ▀▀▀ █
  ▀▀▀▀▀▀▀ █ ▀ ▀ █ █ ▀ █▄▀ ▀ █ ▀ ▀▀▀▀▀▀▀
  █▄▄ █▄▀█▀▄ ▀ ▀▀▀▀ ▄█▀ ▄ █▄ █▄▀█▀██ ▄▀
  ▄ ██▄▄▀ █ ▀▀▀█ █▄▄██▄▄▀▀▀▀▄▀▀ █▄▄▀█▄
  ▄▄█▀▄▄▀▀▀ ▀█▀█ ▄▀  ▄▀██▄ ▄▄▄  ▀█▄  ▀█
  █▄▄██▄▀▀▀█▀ ▀ ████▄ ▄ ▄▀█▀▄██▀█ █▀█ ▄
  ██▄ ▄▄▀█ ▄▄ ▄▄  ▄ ▀█▄ ▀█▀▄ ▄ ██▀█ █▄
  ▀▀█▀ ▄▀▀██▀ █▀█ ▀▄█ ▀▄██▄ ██▀ █▄  █ ▄
  ▄▀▄▄▄█▀▄ ██▄█▄█▀█▄▄▀▄▀▀▄▄▄ ▄██▀▄▄  ▀▄
   ▀  ▄ ▀ █▄▄▀  ██▄ ▀ ██▀▀▀ ██▀▀▄ ▄ █
  ▄ ▀▄█▄▀██  █▄█▀▀▀ ▄█▀ ▄▄▀▄▄▄▀██▄▄▀█ ▀
    ▄ ▀█▀ ▀▀█ ▀███▄▄▀█▄█ ██▀ ▀█▄ ██▀▄▄▄
  ▀▀  ▀ ▀ █▀ ▄██▄ ▄▀▀ ▄███▀█▄██▀▀▀█▄ ▄█
  █▀▀▀▀▀█ ▀▀▀███▄▀██▄ █ ▄█▄ █ █ ▀ █ █
  █ ███ █ ▀██ ▄▀▀▀▄ ▀▄▄ ▀▄▄▄ ▄████▀▀▀▀█
  █ ▀▀▀ █  ▄▀▄▄█▀ ▀▄▀ ▀█▄▀    ▄█▀▀  █▄
  ▀▀▀▀▀▀▀ ▀  ▀▀  ▀   ▀ ▀  ▀  ▀    ▀  ▀▀

Your new secret key is: 54DPGWF6JIP5QKDIJAO4LKSRZ4
Enter code from app (-1 to skip): -1
Code confirmation skipped
Your emergency scratch codes are:
  29768826
  74775980
  66444886
  65776062
  76818695

Do you want me to update your "/home/user/.google_authenticator" file? (y/n) y

Do you want to disallow multiple uses of the same authentication
token? This restricts you to one login about every 30s, but it increases
your chances to notice or even prevent man-in-the-middle attacks (y/n) y

By default, a new token is generated every 30 seconds by the mobile app.
In order to compensate for possible time-skew between the client and the server,
we allow an extra token before and after the current time. This allows for a
time skew of up to 30 seconds between authentication server and client. If you
experience problems with poor time synchronization, you can increase the window
from its default size of 3 permitted codes (one previous code, the current
code, the next code) to 17 permitted codes (the 8 previous codes, the current
code, and the 8 next codes). This will permit for a time skew of up to 4 minutes
between client and server.
Do you want to do so? (y/n) n

If the computer that you are logging into isn't hardened against brute-force
login attempts, you can enable rate-limiting for the authentication module.
By default, this limits attackers to no more than 3 login attempts every 30s.
Do you want to enable rate-limiting? (y/n) y
$ google-authenticator
Проверить работу двухфакторной аутентификации можно командой:
$ radtest пользователь <пароль><код> localhost 1218 testing123
Например:
$ radtest user 123400919 localhost 1218 testing123
Sent Access-Request Id 80 from 0.0.0.0:45177 to 127.0.0.1:1812 length 74
	User-Name = "user"
	User-Password = "123400919"
	NAS-IP-Address = 192.168.0.101
	NAS-Port = 1218
	Message-Authenticator = 0x00
	Cleartext-Password = "123400919"
Received Access-Accept Id 80 from 127.0.0.1:1812 to 127.0.0.1:45177 length 20
Настройка клиентов
В примере, в качестве клиента используется OpenUDS.
Настроить Радиус аутентификатор на OpenUDS.
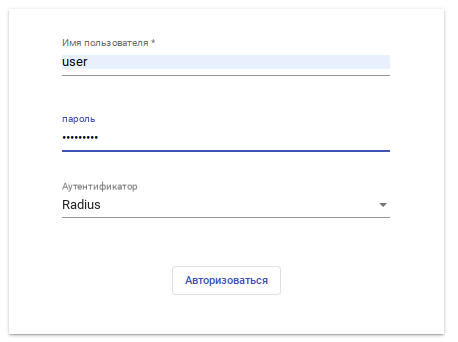
После выполнения всех вышеперечисленных операций можно подключаться. В форме входа OpenUDS необходимо выбрать аутентификатор, указать пользователя, пароль следует указывать в формате: <пароль><6-значный код из приложения Google Authenticator>):

